I felt like this is where the plans start to get more difficult. I've definitely built up my skills at this point, but leafing through this section was a little intimidating at first. Fortunately, nothing that I'm about to do hasn't already been accomplished and documented by hundreds of other builders. The forums are beyond helpful.
Once the substructure was complete, it was time to dimple both skins. I got in a rush and didn't have one skin settled on the dimple die properly and went through the skin slightly offset from the factory hole, resulting in a tear. It was too close to the original placement to warrant a new rivet, but too far offset to drill out for an oops rivet. In the end, I consulted with Vans and they said a new skin was probably the safest bet. It was a blessing in disguise, as I have used that skin for scrap on other projects along the way (e.g. fiberglass forms).
Once I had the replacement skin, I continued with mock up, disassembly and deburring. I used blue painters tape to protect the parts inside the skin that wouldn't be in contact with the fuel tank sealant used to secure the foam ribs.
Once both sides of the skin are sandwiched together, the plans call for pop rivets toward the trailing edge to keep the ribs together. This was a real pain, figuratively and literally. There's very little room to work and using the pop riveter was tough on the hands/wrists.
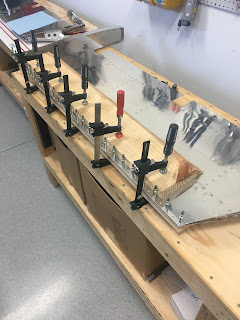
Once the foam ribs are in place and secured with fuel tank sealant, both sides need to be clamped together. I found that clecoes, spare lumber and woodworking clamps worked well for both trailing edges as well as the trim tab.
Once I was ready to rivet the trailing edge, the dimple die set pictured below was a huge win. It's angled perfectly for the RV-14 trailing edge angles and made that part of the process a breeze with near perfect results.
Rolling the leading edges was identical to the rudder rolling. However, I found out later that once the elevators were attached to the Horizontal Stab that the rolled edge was rubbing against the rear spar of the HS. I found that a perfectly rounded edge wouldn't work. I had to remove the elevators and flatten the area closest to the pop rivets on the rolled edge. It took quite a few assemblies to get this right where I felt like I had flight control travel called for in the plans.
I attached packing tape or duct tape to different size dowels/pipe to get the desired curvature along the leading edges of the elevators as well as the rudder. I then used downward pressure (toward the table) and rolled the edge toward the trailing edge with one hand on each vice grip. Once I ran out of space to rotate the edge, I then released and reattached the vice grips to give me more authority to roll the edge. Seemed to work fine until I determined that the rolled edge that allowed me to cleco and rivet top and bottom together still wasn't quite right to provide clearance from the HS.
Total time invested in the elevators and trim tab came out to about 48 hours.


No comments:
Post a Comment